


Never Freeze Again in Your Car! Ultimate Guide to Choosing & Installing a Parking Heater Exhaust Duct
1.Small but Mighty: What Exactly Is a Parking Heater Exhaust Duct?
1.1 Basic Definition of the Duct
On those freezing winter days, when your car is parked and you want the cabin to warm up in a flash, a parking heater is a lifesaver. But hidden in this heating system is a part that’s often overlooked—yet absolutely crucial: the parking heater exhaust duct.
Think of it as the lifeblood channel of your car’s heating system. It connects the heater unit to the cabin or engine bay, responsible for smoothly delivering the warm air generated by the heater to where it’s needed most.
There are two main types: intake and exhaust ducts, which work together to ensure proper air circulation and heat transfer. In common fuel-powered heating systems, this duct is an indispensable component that makes sure heat is transferred efficiently, keeping you cozy even when your car is parked.
1.2 Main Materials & Core Specifications
Most parking heater exhaust ducts on the market are made of aluminum foil, a smart choice for a good reason. Aluminum foil is highly heat-resistant, so it can handle the high temperatures of the heater’s hot air without warping or breaking. It’s also super flexible, making it easy to fit into the tight, complex spaces of your car—whether you need to loop around other components or follow the curves of the car body. Plus, it has heat insulation and telescopic properties, which can effectively reduce heat loss and adapt to temperature changes, keeping the duct working stably.
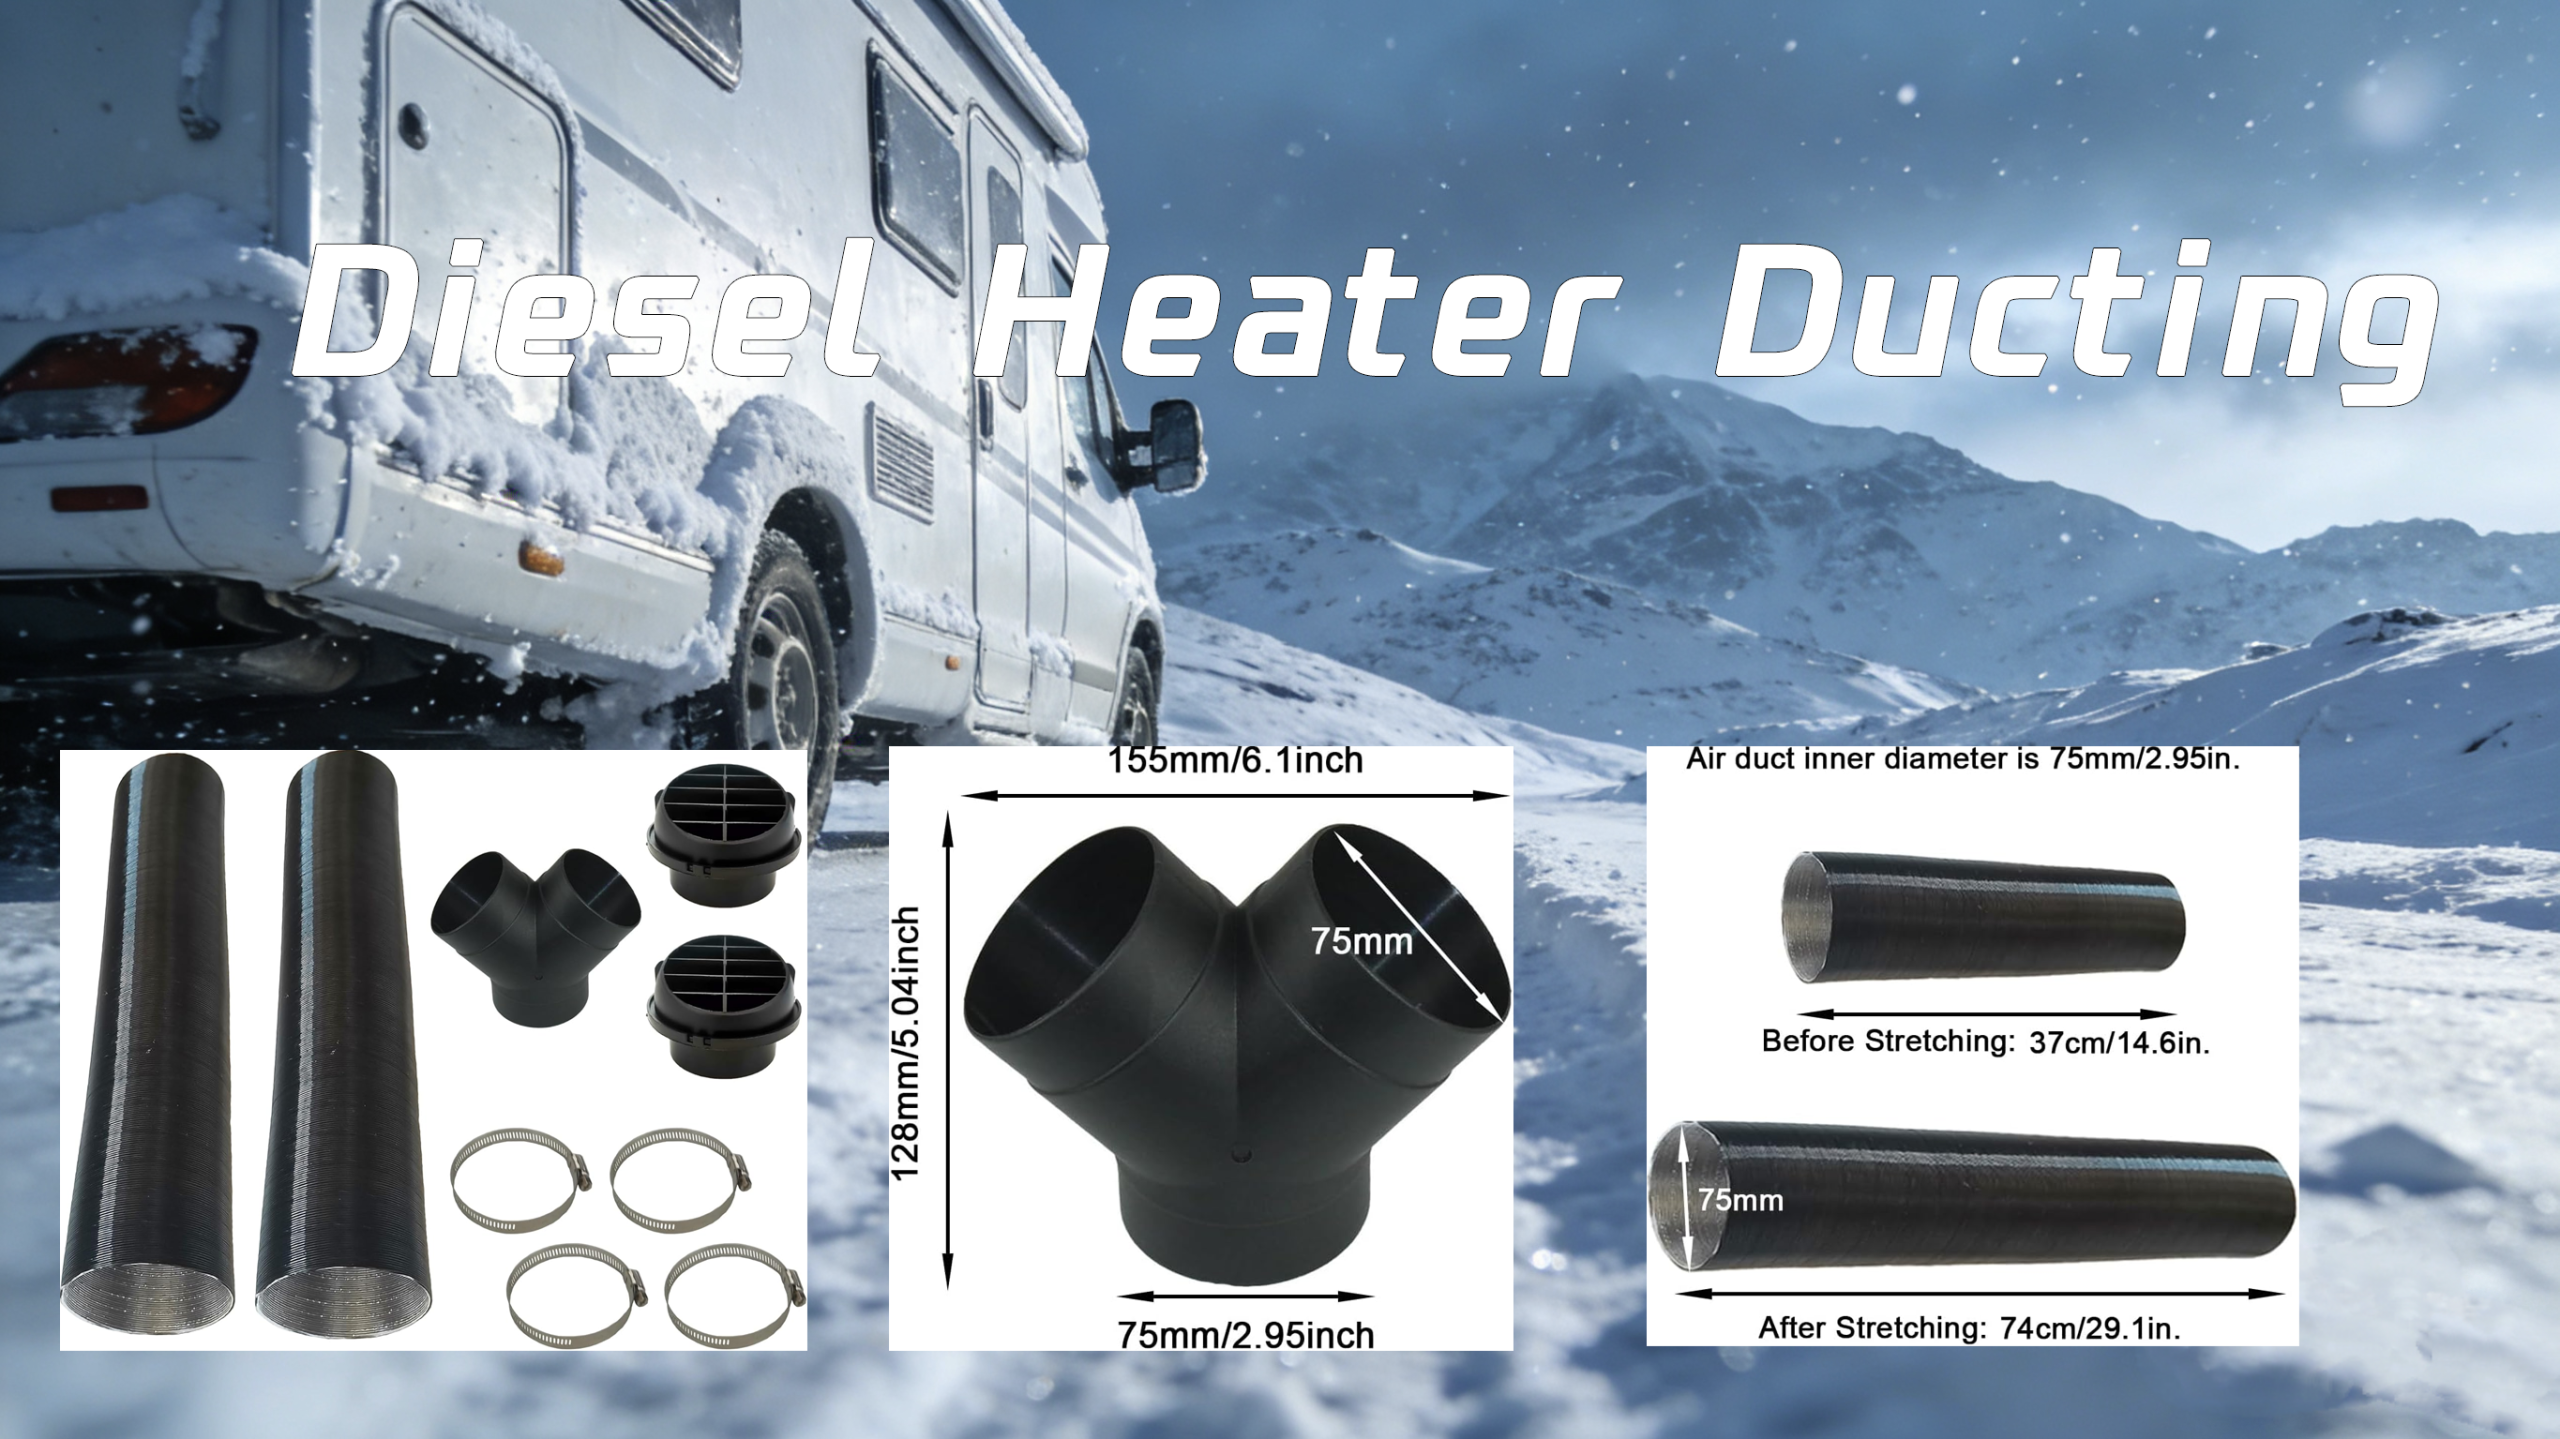
In terms of size, the 40–90mm diameter is the most popular choice. This size fits most parking air heaters, ensuring the right airflow and heat delivery speed. Typically, the duct comes in a 1-meter base length, paired with 2 clamps for easy installation and secure fixing.
What’s more, as the demand for parking heaters grows worldwide, these ducts are exported to markets across North America, Europe, Southeast Asia, and beyond, bringing warmth to car owners everywhere.
2.A Must-Have for Winter Driving: 4 Key Roles of the Parking Heater Exhaust Duct
2.1 Maintain Engine Temperature & Reduce Cold-Start Wear
When winter temperatures drop to -10°C or even lower, your car’s engine enters a “frozen state”. The engine oil thickens like molasses, losing its fluidity. If you start the car directly in this condition, the internal parts will grind against each other with high resistance, leading to severe wear.
According to professional research, over 80% of engine wear occurs during cold starts. But the parking heater exhaust duct acts like a cozy blanket for your engine. It delivers the heater’s heat directly to the engine, keeping it at a stable working temperature (around 80–90°C). This ensures the oil stays fluid, reduces friction between parts, and eases the extra stress on the engine caused by low temperatures.
For example, in the extremely cold regions of Northeast China, cars with properly installed ducts can extend their engine’s major service intervals by 20,000–30,000 kilometers, cutting down on repair costs for car owners.
2.2 Warm Up Faster & Save Fuel, Shorten Idle Time
In the past, on cold winter mornings, you’d have to go out early to start your car and let it idle for ages just to warm up the cabin and engine. Not only was this a waste of time, but it also burned a lot of fuel.
Imagine standing in the cold, waiting for your car to warm up so you can head to work—frustrating, right? But with a parking heater exhaust duct, things get way better. It acts as a high-efficiency heat transfer agent, quickly spreading warm air throughout the cabin and engine bay.
In just 5–10 minutes, the cabin temperature can rise from a freezing few degrees to a comfortable 15–20°C, and the engine can reach its normal operating temperature in no time. This means you can cut your cold-start idle time by 30%–50%. For a typical family car, that’s 0.5–1 liter of fuel saved per day—add that up over a year, and you’ll be amazed by the savings! Plus, you can get into a warm car the second you open the door, starting your day on a good note.
2.3 Improve Combustion Efficiency & Reduce Exhaust Emissions
Cold starts are a nightmare for fuel combustion. Because the engine is cold, fuel doesn’t mix well with air, leading to incomplete combustion—just like trying to light wet wood. This not only causes poor performance but also increases harmful gases like carbon monoxide and hydrocarbons in the exhaust, which are bad for the environment.
Here’s where the parking heater exhaust duct shines. It helps the engine warm up quickly, reaching its optimal working temperature in minutes. With the engine at the right temperature, fuel and air mix perfectly, leading to complete, efficient combustion—like burning dry wood in a well-ventilated fire.
According to environmental protection department tests, cars with installed ducts can reduce carbon monoxide emissions by 30%–40% and hydrocarbon emissions by 20%–30%. This isn’t just good for the planet—it also helps you avoid failing the annual vehicle emission test, saving you time and hassle.
2.4 Boost Equipment Reliability & Ensure Stable Operation in Low-Temperature Conditions
In extremely cold weather, if the parking heater doesn’t have the duct’s help, most of the heat will be lost during transmission. It’s like having a radiator without insulation—your room will never get warm!
When too much heat is lost, the heater will keep turning on and off to maintain the set temperature, just like a tired person switching between rest and work constantly. This not only wastes energy but also accelerates wear and tear, shortening the heater’s lifespan.
But the parking heater exhaust duct, with its high-quality insulation design, acts like a thick warm coat for the duct. It minimizes heat loss, ensuring the heater’s heat is delivered exactly where it’s needed—whether that’s the cabin or the engine bay. This keeps the heater running smoothly, without frequent on/off cycles, and improves the overall stability of the heating system in freezing conditions.
In high-altitude areas with freezing winters in northern China, high-quality ducts can keep the heater running stably for hours on end, providing reliable warmth for car owners.
3.Avoid Costly Mistakes: 3 Steps to Pick the Perfect Parking Heater Exhaust Duct
3.1 Step 1: Match the Diameter Precisely to Avoid Insufficient Airflow
When choosing a parking heater exhaust duct, the first thing you need to do is check the interface size of your heater. It’s like buying shoes—if the size is wrong, it’ll be uncomfortable and useless!
The most common diameters on the market are 75mm and 80mm, which fit most standard parking heaters. But if your heater is a rare model or has been modified, you need to be extra careful—don’t buy the wrong size!
If the diameter is too small, the hot air will struggle to flow through, like driving in a narrow alley. This leads to slow heating and poor engine warming. If the diameter is too large, the connection won’t be tight, and a lot of heat will escape. This not only wastes energy but also causes the heater to turn on and off frequently, shortening its lifespan.
So, before buying, check the product model and compatible heater list carefully. If you’re not sure, reach out to the seller—double-checking now will save you a lot of trouble later.
3.2 Step 2: Choose the Right Material for Heat Resistance & Flexibility
The material is the key to the duct’s quality and lifespan. Among all the options, aluminum foil is the top choice. It’s heat-resistant, so it can handle the high temperatures of the heater’s hot air without warping or cracking. It’s like a reliable soldier standing firm in its position, no matter how tough the conditions are.
Its flexibility also makes installation a breeze. Cars have tight, cluttered spaces with lots of components. The aluminum foil duct can bend and twist like a flexible dancer, easily navigating around obstacles and fitting perfectly into the car’s structure.
On the other hand, some cheap plastic ducts might seem cheaper, but they’re like fragile paper tigers in high temperatures. They warp and crack easily, which not only affects heating performance but also poses safety risks—like hot air leaking and burning people in the cabin. So, don’t be tempted by low prices—always choose quality materials.
3.3 Step 3: Check the Accessories to Avoid Installation Headaches
When you receive your parking heater exhaust duct, don’t rush to install it—first, check if all the accessories are included. A complete set should include the duct itself plus clamps for fixing.
Clamps might be small, but they’re super important—they’re the small but mighty guards that keep the duct tightly connected to the heater and the outlet. If you don’t have clamps (or if they’re low-quality), the connection won’t be tight, and hot air will leak out like a broken faucet. Your cabin won’t warm up, and all your installation work will be wasted—you’ll have to start over, which is a total hassle.
Some sellers also offer bonus accessories like T-adapters and reducers. These are a godsend for car owners who want multiple heat outlets or want to modify their car’s heating system. They let you customize the heat distribution according to your needs, making your heating system more personalized.
So, make sure to check the accessory list before buying—complete accessories are the foundation for a smooth installation.
4.For DIY Enthusiasts: The Correct Way to Install a Parking Heater Exhaust Duct
4.1 Pre-Installation Prep: Pick the Right Location & Gather Tools
The first step to installing the duct is to choose the right spot for the heater unit. For sedans and most SUVs, the area under the headlights is a great choice—it’s spacious enough for installation, and it’s close to the cabin, so the hot air can be delivered efficiently.
For SUVs with ample undercarriage space, you can also install the unit there. This saves cabin space and takes advantage of the undercarriage’s cooling properties.
No matter where you choose, never install the unit or the pump upside down—this will mess up the oil and circuit systems, leading to malfunctions.
To reduce heat loss and improve efficiency, it’s a good idea to get some aluminum foil insulation cotton. Wrap it around the heater unit before installation—it’s like putting a warm coat on the unit, blocking heat from escaping into the surrounding environment.
4.2 Core Installation Steps: Wire Fixing → Duct Connection
First, follow the product manual to fix the heater unit securely in the chosen spot. Make sure it’s stable—you don’t want it shaking or making noise while the car is running.
Next, connect the fuel pump to the fuel tank. This is crucial—like delivering blood to the body, stable fuel supply is the key to the heater’s normal operation.
Then, connect the positive and negative battery terminals to the heater controller. Once connected, use cable ties or insulation tape to secure the wires tightly—this prevents loose connections that could cause power issues.
Now, it’s time to connect the duct. First, slide one end of the duct onto the heater’s hot air outlet—make sure it’s fully inserted. Then, use clamp pliers to tighten the clamps, ensuring a tight, airtight seal.
Finally, run the other end of the duct along the pre-planned path to the designated area in the cabin or engine bay. Keep the duct as straight as possible—no kinks or twists, or the hot air will get blocked, and the heating performance will drop.
For example, inside the cabin, you can route the duct along the side of the seat or under the center console—it’s discreet, keeps the cabin tidy, and ensures the heat is delivered where you need it most.
4.3 Critical Installation Tips
If you’re installing an integrated unit, make sure the exhaust pipe is connected to the outside of the car. This is a must for your safety and the air quality inside the cabin. Integrated units produce exhaust gases during operation—if the pipe isn’t connected to the outside, the gases will flow back into the cabin, which is extremely harmful to your health.
When routing the duct, avoid moving parts like the wheels and drive shafts—this prevents them from scratching or squeezing the duct while the car is running, which could damage the duct. Also, keep the duct away from high-temperature sources like the engine’s exhaust pipe and radiator—high temperatures can damage the duct material, shortening its lifespan and affecting its performance.
Once the installation is done, don’t call it a day—test it thoroughly! Turn on the parking heater and check if the hot air is flowing smoothly, and if the cabin or engine bay area is getting warm quickly. Also, listen for any unusual noises—if you hear any, it might be because the parts are loose or the duct is damaged.
Check the duct connections for any air leaks—you can do this by touching the duct with your hand and feeling the airflow. If you find any issues, fix them immediately to ensure the duct works stably and efficiently, providing reliable warmth for your car on cold winter days.
5.Summary : Got Your Winter Car Heating Hacks?
5.1 Full Summary
The humble parking heater exhaust duct is an indispensable hero in winter driving. It’s a “cozy little jacket” for your engine, protecting it from the cold and reducing wear and tear. It also makes fuel burn more efficiently, cutting down on emissions and helping the environment.
It’s also a guardian of your wallet—it warms up your car fast and saves fuel, so you can enjoy big savings over time. And it’s a reliable partner for your parking heater, ensuring heat is delivered efficiently and the system runs stably in cold conditions.
To get the most out of your duct, focus on three key factors: matching the diameter, choosing the right material, and checking the accessories. And for installation, take your time, follow the steps carefully, and test thoroughly—every step matters!