Tubo de escape de la calefacción de tu autocaravana o camioneta: ¡No lo dejes pasar por alto! (Consejos de seguridad para el invierno que necesitas)
1. Primero lo primero: ¿Qué es el tubo de escape de un calefactor de estacionamiento? (Es más importante de lo que crees)
1.1 ¿Qué es exactamente?
Cuando llega el invierno, los calentadores de estacionamiento son una revolución total para los autocaravanistas y camioneros: te mantienen calentito cuando hace mucho frío afuera. Pero la mayoría de la gente pasa por alto su pequeño compañero: el tubo de escape. Este no es un tubo cualquiera, es el héroe anónimo que se deshace de todos los malos humos del calentador. Vamos a desglosarlo de forma simple: tiene dos partes principales, la sección de conexión y la sección recta. La sección de conexión se sujeta firmemente a la placa de soporte de tu vehículo con soportes y fijaciones (como un abrazo súper seguro), por lo que nunca se suelta. ¿La sección recta? Es flexible: puedes agregar curvas o piezas suaves para adaptarse a espacios reducidos en tu autocaravana o camioneta. ¿Su única función? Sacar esos gases de escape dañinos de tu vehículo para siempre, para que puedas respirar tranquilo dentro.
1.2 Por qué es un salvavidas total en invierno
La verdad es que cuando usas una calefacción de estacionamiento, quema combustible y produce monóxido de carbono, un gas silencioso y mortal. Si el tubo de escape se desprende o no está bien sellado, esos gases entrarán en tu vehículo cerrado sin que te des cuenta. He visto noticias de gente que se quedó dormida con la calefacción encendida y se envenenó porque el tubo de escape tenía una fuga. ¿Un tubo de escape de buena calidad? Es como tener un guardia de seguridad las 24 horas. Se queda en su sitio, sella herméticamente e impide que entren esos gases mortales. Créeme, este pequeño tubo podría salvarte la vida este invierno.
2. Analicemos los materiales y la estructura de los tubos de escape
2.1 Materiales populares: elige lo que mejor se adapte a ti
No todos los tubos de escape son iguales; cada material tiene sus propias ventajas. Empecemos por el acero inoxidable: es el campeón de la durabilidad. Soporta altas temperaturas (¡sin derretirse ni deformarse!) y no se oxida, incluso si usa la calefacción a diario. Perfecto para camioneros que viajan sin parar o para quienes acampan en autocaravanas en condiciones climáticas adversas.
También existe el tubo corrugado de aluminio, el flexible. Es como una pajita flexible: cabe en espacios reducidos donde un tubo recto no puede. Además, no deja escapar mucho calor, por lo que la calefacción funciona mejor. Ideal para autocaravanas o camionetas pequeñas con espacio limitado en la parte inferior.
Y no olvides los materiales compuestos: son todoterreno. Son resistentes al calor, al desgaste e incluso a los productos químicos. Si conduces por zonas industriales o lugares con mal tiempo, esta es tu mejor opción. ¿En definitiva? Elige un material que se adapte al uso que le das a tu vehículo; ¡no hay una solución universal!
3. ¡No más malas compras! Cómo elegir el tubo de escape adecuado
3.1 Material primero: busque resistencia al calor y al óxido
Al comprar, comience por el material, y el acero inoxidable es la mejor opción. Como mencioné antes, soporta las altas temperaturas como un profesional (sin preocuparse de que se derrita al encender la calefacción) y no se oxida. Ya sea que se trate de los húmedos inviernos del sur o de las salinidades de las carreteras del norte (por el deshielo), el acero inoxidable durará mucho más que los materiales más económicos. ¿Camioneros que viajan por todo el país? Esto es obvio: significa menos reemplazos y menos problemas.
Si necesitas algo flexible (¿recuerdas espacios reducidos?), el tubo corrugado de aluminio también funciona, ¡pero revisa el rango de temperatura! Un buen tubo debería soportar temperaturas de -40 °F a 480 °F (de -40 °C a +250 °C). Si no, se ablandará o agrietará al calentarse, lo que podría provocar una fuga. Revisa siempre las especificaciones del producto; no malgastes dinero en uno defectuoso.
3.2 El tamaño importa: adáptelo a su calentador y vehículo
El tamaño es decisivo: no querrás un tubo demasiado grande ni demasiado pequeño. Primero, el diámetro: es como comprar zapatos: tiene que encajar perfectamente con la salida de escape de tu calefactor de estacionamiento. El tamaño más común es de 25 mm (1 pulgada), ¡pero mide el tuyo primero! Si está demasiado suelto, se escapan los gases; si está demasiado apretado, no podrás instalarlo. Créeme, medirlo en 2 minutos te ahorrará un gran dolor de cabeza más adelante.
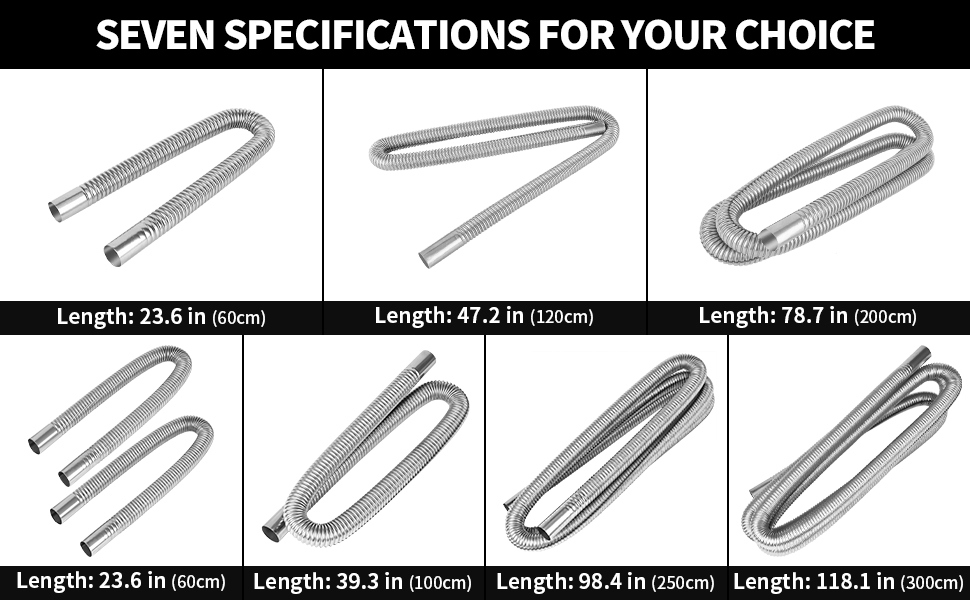
La longitud es la siguiente: varían de 0,6 a 3 m (2 a 10 pies). ¿Demasiado largo? Los gases se atascan en el tubo (un problema desagradable y peligroso). ¿Demasiado corto? No llega al exterior del vehículo, por lo que los gases se acumulan en el interior. Para coches pequeños o autocaravanas compactas, de 0,6 a 0,9 metros es suficiente. ¿Para camionetas grandes o autocaravanas Clase A? Podría necesitar 1,8 metros o más. Mida la distancia desde el calefactor hasta el punto donde desea que salga el escape y elija la longitud adecuada (agregue un poco más si necesita doblarlo).
4. ¡La seguridad es lo primero! Cómo instalar correctamente el tubo de escape
4.1 Trabajo de preparación: Elija primero el lugar correcto
Instalar un tubo de escape no es ciencia espacial, pero la preparación es clave, y la ubicación lo es todo. Primero, reúne tus herramientas: el tubo, las abrazaderas de manguera (súper importantes para asegurarlo) y los soportes. No te saltes ninguna pieza: las abrazaderas de manguera son baratas, pero una fuga en el tubo es mortal.
Ahora, el punto clave: la salida de escape DEBE estar orientada hacia la parte trasera o lateral del vehículo, NUNCA hacia la cabina. Si está orientada hacia la cabina, incluso una fuga minúscula puede hacer que los gases vuelvan al interior mientras conduces. He oído historias de terror de conductores que la instalaron mal y se intoxicaron mientras dormían la siesta. Además, evita las zonas que se calientan (como cerca de las llantas; las piedras y la tierra la rayan) o los puntos muy calientes (como junto al motor; el calor arruina el tubo más rápido). Asegúrate de que no toque ningún cable ni manguera; la vibración de la conducción los desgastará.
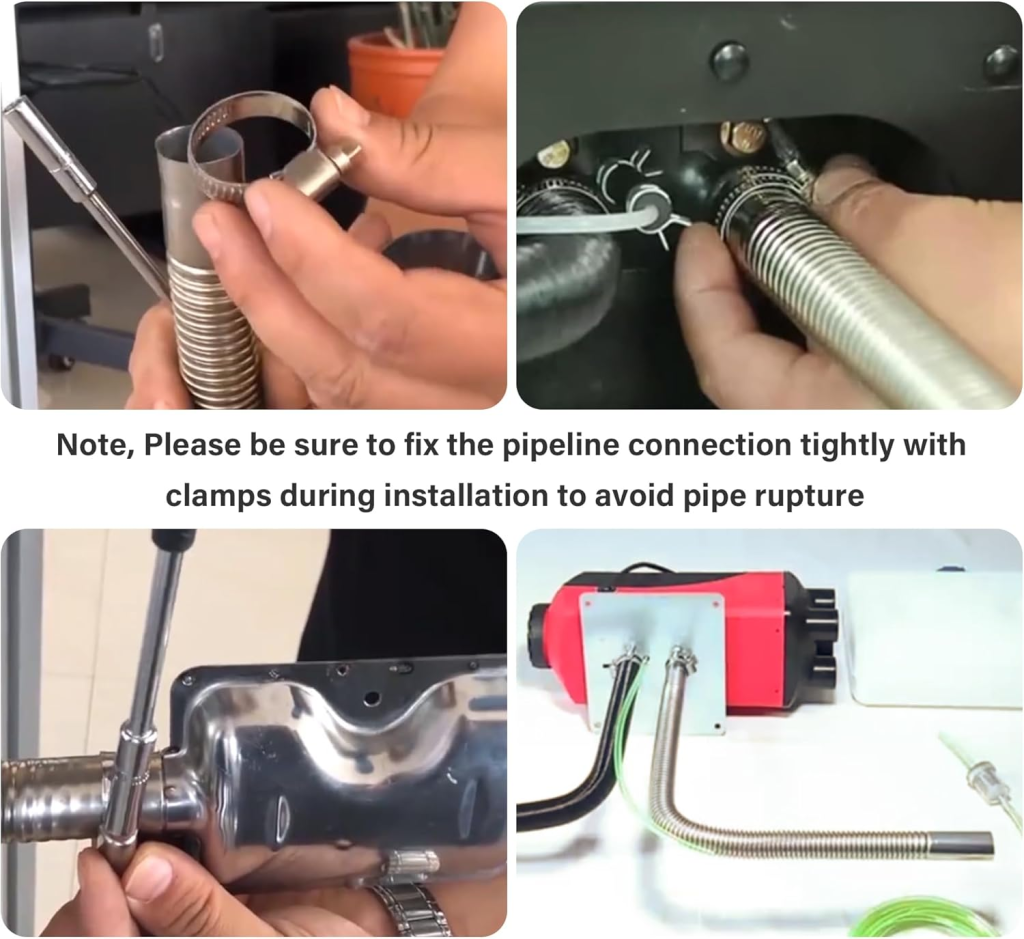
4.2 Instalación paso a paso: la clave está en que esté bien sellada y hermética
Cada paso cuenta: si está suelto o tiene fugas, es peligroso. Así es como se hace correctamente: Paso 1: Pase la sección de conexión por el orificio de la placa de soporte de su vehículo. Use los soportes y las abrazaderas para sujetarla firmemente, uno a cada lado de la placa, como un sándwich. Coloque una junta entre el soporte y la placa; es como un sello que evita que se escapen los gases y amortigua las vibraciones (¡se acabaron los traqueteos!).
Paso 2: Conecte la sección recta a la salida de escape de su calentador. Primero, deslice una abrazadera de manguera sobre la conexión y luego presione el tubo firmemente. Apriete la abrazadera, ¡pero no se exceda! Si está demasiado apretada, el tubo se agrietará; si está demasiado floja, tendrá fugas. Si necesita cambiar la dirección del escape, añada un codo ahora; asegúrese de que también esté bien sellado. Revise cada conexión a medida que avanza; muévala un poco para asegurarse de que no esté floja. Sin espacios ni ondulaciones = seguro.
4.3 Comprobación posterior a la instalación: ¡No omita estos 2 pasos!
¿Lo instalaste? Genial, pero aún no has terminado. Estas dos comprobaciones son tu última línea de defensa. Primero, pruébalo: enciende la calefacción y déjala funcionar unos minutos. Revisa todas las conexiones; no se permiten olores extraños (como a combustible o escape). Presta atención a ruidos extraños: traqueteos, raspaduras o silbidos significan que algo está suelto. Si ves una fuga de humo, apágalo inmediatamente y repáralo.
Segundo, sacúdalo: tire y mueva suavemente el tubo. Debe permanecer firme como una roca. Si alguna pieza se mueve, apriete las abrazaderas o los soportes. Recuerde que su vehículo vibra al conducir; lo que esté suelto ahora se caerá más tarde. Solo cuando ambas comprobaciones pasen, podrá relajarse: su tubo de escape estará seguro.
5. Cuidado diario y normas de seguridad: Manténgalo funcionando (y manténgase seguro)
5.1 Fácil mantenimiento: Haz que dure más
Cuidar el tubo de escape es fácil: solo toma unos minutos. Antes y después de usar la calefacción, revise el exterior: busque óxido (especialmente alrededor de las conexiones, donde se acumula agua). Si ve pequeñas manchas de óxido, líjelas y aplique un protector contra el óxido. Revise también las abrazaderas; pueden aflojarse con el tiempo, así que apriételas si es necesario.
Después de la lluvia o la nieve, limpie la tubería; el agua causa óxido. Si está muy mojada, use un secador de pelo (a baja temperatura) para secarla. La acumulación de carbón es otro problema: con el tiempo, el hollín obstruye la tubería, lo que provoca la acumulación de humos. Use un limpiador de carbón especializado cada pocos meses para mantenerla limpia. Si observa alguna abolladura, grieta o agujero, reemplácela inmediatamente. Una pequeña grieta hoy se convierte en una gran fuga mañana.
Si no usa la calefacción en verano, cubra el tubo de escape (para evitar la entrada de insectos y suciedad) y rocíela con protector antióxido. Estará lista para usar cuando llegue el invierno.
5.2 Líneas rojas de seguridad: ¡Nunca hagas estas cosas!
Algunos errores son mortales; no cruces estos límites. Primero: NUNCA apuntes el escape hacia la cabina ni a un espacio cerrado. El monóxido de carbono es invisible e inodoro; no sabrás que está ahí hasta que sea demasiado tarde. He leído historias de conductores que cortaron distancias y estacionaron con el escape hacia la cabina; se despertaron enfermos (o algo peor). Siempre apúntalo hacia atrás o hacia un lado, donde los gases pueden dispersarse.
Segundo: No duerma en un vehículo cerrado con la calefacción encendida, incluso si la tubería está bien instalada. Los accidentes ocurren: las abrazaderas se aflojan, las tuberías se agrietan o los gases vuelven a entrar. Si tiene que echarse una siesta, abra una ventana; un poco de aire fresco puede salvarle la vida.
Tercero: ¡Nunca modifiques la tubería! No la cortes, ni la ensanches ni la dobles demasiado. El tamaño está diseñado para que coincida con el de tu calentador; cambiarla provoca que los gases se acumulen (lo que puede causar explosiones o intoxicaciones). Hay quienes intentan ahorrar dinero manipulándola; no seas esa persona. Sigue las instrucciones y estarás seguro.
Al fin y al cabo, este pequeño tubo de escape es uno de los componentes de seguridad más importantes de tu sistema invernal. Es económico, fácil de instalar y de cuidar, pero podría salvarte la vida. No lo ignores: elige el adecuado, instálalo correctamente y ¡mantente calentito (y seguro) este invierno!